Feb 6, 2010

Thực hiện việc chuyển Text và Chuyển mã Hexa ra Serial Port

Thực hiện việc chuyển Text và Chuyển mã Hexa ra Serial Port bằng C# với .Net FrameWork 2.0
Code:
using System.IO.Ports;
using System.IO;
using System;
using System.Collections.Generic;
using System.ComponentModel;
using System.Data;
using System.Drawing;
using System.Text;
using System.Windows.Forms;

private SerialPort comport = new SerialPort("COM1", 9600, Parity.None, 8, StopBits.One);

public Form1()
{
InitializeComponent();
}

private void btnKetThuc_Click(object sender, EventArgs e)
{
Close();
}
private void btnTestPort_Click(object sender, EventArgs e)
{
try
{
comport.Open();
this.comport.DtrEnable = true;
this.comport.RtsEnable = true;

}
catch
{
txtThongBao.Enabled = true;
txtThongBao.Text = "Có sự cố khi mở cổng Com, hãy kiểm tra lại hệ thống, Chương trình chưa thực hiện được!";
}
if (comport.IsOpen)
{
btnTestPort.Enabled = false;
btnHexTx.Enabled = true;

btnClosePort.Enabled = true;

txtRx.Enabled = true;
txtHexTx.Enabled = true;
txtTx.Enabled = true;
txtThongBao.Enabled = true;
txtThongBao.Text = "Cổng Com 1 đã được mở rồi, bắt đầu chiến đấu đi";

}
else this.Focus();

}


private void dulieuden(object sender, SerialDataReceivedEventArgs e)
{
txtRx.Enabled = true; // Hiển thị TextBox nếu Dữ liệu đến
btnRx.Enabled = true; // Hiển thị button Ẩn nếu Dữ liệu đến
comport.DataReceived += new SerialDataReceivedEventHandler(dulieuden);

}

// Đọc toàn bộ dữ liệu lưu tại buffer, triệu tập dữ liệu lưu trong hàm dulieuden
private void btnRx_Click(object sender, EventArgs e)
{
string docdulieu = comport.ReadExisting().ToString();
this.txtRx.Text = docdulieu;
txtThongBao.Text = "Dữ liệu nhận được ứng với mã Hexa là: " + AtoX(docdulieu);
}

private void btnClosePort_Click(object sender, EventArgs e)
{
comport.Close();
txtThongBao.Text = "Cổng Com đã được đóng";

btnTestPort.Enabled = true;
btnHexTx.Enabled = false;


txtTx.Enabled = false;
txtHexTx.Enabled = false;
txtThongBao.Enabled = false;

btnClosePort.Enabled = false;
}
Việc truyền nhận mã hexa ta quy ước vào một hàm, hàm này với chức năng chuyển đổi sang mã định dạng Hexa để truyền qua Serial Port

// Chuyển đổi Chuỗi ASCII sang Định Dạng Hexa.

Code:
private string AtoX(string asc)
{
int nLines;
int nChars;
int offset;
string hex = " ";

// tính toán số lượng dòng Hexa.
if ((asc.Length % 16) > 0)
nLines = asc.Length / 16 + 1;
else
nLines = asc.Length / 16;

// Chuyển đổi sang những dòng Hexa.
for (int i = 0; i < offset =" i"> 16)
nChars = 16;
else
nChars = asc.Length - offset;
hex += this.HexLine(i, asc.Substring(offset, nChars)) + "\r\n";
}
return hex;
}

///
/// Chuyển một chuỗi ASCII 16 byte sang định dạng hexa.
///

private string HexLine(int lNum, string asc)
{
string hex = "";

// Copy dòng vào bộ đệm.
char[] c = new char[16];
asc.CopyTo(0, c, 0, asc.Length);

// Tạo offset.
hex += String.Format("{0:X8} - {0:X8}", lNum * 16, (lNum + 1) * 16 - 1);
hex += " ";

// Chuyển các ký tự sang định dạng chuẩn hexa.
for (int i = 0; i < nspaces =" 62" i =" 0;" i =" 0;"> 126))
hex += ".";
else
hex += c[i].ToString();
}

// Trả lại dòng hexa .
return hex;
}

private void btnHexTx_Click_1(object sender, EventArgs e)
{
try
{
byte[] data = HexStringToByteAray(txtHexTx.Text);
comport.Write(data, 0, data.Length); //Đưa mảng số Hexa qua cổng com với định dạng chuẩn
string a = this.txtTx.Text;
comport.Write(AtoX(a));
txtThongBao.Text = "Thông tin được gửi ra cổng RS232 với mã Hex là: " + txtHexTx.Text.ToUpper() + "\r\n \r\n" + "Thông tin được gửi ra cổng RS232 chuyển sang mã Hex Tập tin Text là: \r\n \r\n" + AtoX(a).ToString();


}

catch (FormatException)
{
txtThongBao.Text = "Có thể cổng com đóng hoặc bạn nhập chính xác Mã Hexa cần Truyền Nhận. Không nhận được định dạng chuỗi sau: " + txtHexTx.Text.ToUpper();
}
return;
}
một Class riêng để có thể nhúng trực tiếp vào chương trình khi thiết kế ứng dụng phần mềm!

Code:
using System;
using System.Collections.Generic;
using System.ComponentModel;
using System.Data;
using System.Drawing;
using System.Text;
using System.Windows.Forms;
using System.Data.SqlClient;
using System.IO.Ports;
using System.Threading;

class ComPorts
{
public Boolean OpenComPortOk;
public ComPorts()
{

}
~ComPorts()
{

}
///
/// Mo cong COM1
///

///
public SerialPort Open(String Port, int Baud, Parity Prt, int DtB, StopBits StB)
{
//SerialPort ComPort = new SerialPort("COM1", 9600, Parity.None , 8, StopBits.One);
SerialPort ComPort = new SerialPort( Port,Baud, Prt, DtB, StB);
try
{
if (!ComPort.IsOpen)
{
ComPort.Open();
this.OpenComPortOk = true;
}
}
catch (Exception e)
{
MessageBox.Show("Lỗi mở cổng:"+e.ToString());

this.OpenComPortOk = false;
return ComPort;
}
ComPort.RtsEnable = true;
ComPort.DtrEnable = true;

return ComPort;
}
public void Close()
{

}
///
/// Send(SerialPort ComPort, String data) se
/// Gui chuoi data ra cong ComPort
///

///
///
public void Send(SerialPort ComPort, String data)
{
ComPort.Write(data);

}
public String Receive(SerialPort ComPort)
{
String ReceiveData = "";
ReceiveData = ComPort.ReadExisting();
return ReceiveData;


}
public byte ReceiveByte(SerialPort ComPort)
{
byte Value;
Value = Convert.ToByte(ComPort.ReadByte());
return Value;
}

}
File gửi kèm
File  Type: rar ComPorts.rar (876 Bytes, 993 views)

Khi bạn sử dụng Serial Port, bạn nhúng Class vào chương trình và khai báo trong cửa sổ code của bạn

using System.IO.Ports;
using System.Threading;

Việc gọi Class bạn chỉ cần làm như sau:

Nhấn CRT + Space và bạn chọn ComPorts

Việc sử dụng chính là bạn khai thác ngay trực tiếp các Method mình đã xây dựng trong Class đó! Truyền tham số vào như ý muốn của bạn!

Chúc bạn thành công!

iện đây cũng muốn nói chút xíu về ứng dụng. Mình thấy có anh em quan tâm đến việc Điều Khiển Máy Tính từ xa! Anh em rất vất vả khi đi thiết kế phần cứng. Quan điểm của mình, thì lại thấy việc này rất đơn giản.

Thiết kế một Modune Thu Phát Hồng Ngoại với việc sủ dụng MCP2155 hoặc MCP2150 để thiết kế!

Sau đó, lên một thiết kế về khung truyền những tương tác với máy tính chúng ta cần điều khiển, gán các chỉ thị và các tập lệnh thành một Khung Truyền riêng! Việc này cần tối ưu vì đó là việc chúng ta đi xây dựng một Class trong chương trình của chúng ta!

Ứng dụng vào ra với Serial Port, viết phần mềm tương tác với các chức năng quản lý hệ thống máy tính. Việc này các Componet của .Net FrameWork 2.0 rất mạnh. Chúng ta chỉ cần Add các Referrence vào modune của chương trình là có thể thao tác một cách dễ dàng!

Thêm một nhân tố rất hữu ích nữa là việc ta điều khiển máy tính của ta qua Internet! Mình ngồi ở Văn Phòng cũng có thể điều khiển được máy tính của ta! Ta lập trình Socket C# với .Net. Có thời gian mình sẽ Post ứng dụng của mình lên để anh em cùng tham khảo về kỹ thuật lập trình Mạng với C#.

Xin cảm ơn!

http://www.dreamincode.net/forums/showtopic35775.htm
http://dientuvietnam.net/forums/showthread.php?t=3046&page=4

SerialPort (RS-232 Serial COM Port) in C# .NET

SerialPort (RS-232 Serial COM Port) in C# .NET

Published 23 March 5 7:28 PM | coad

This article is about communicating through the PC's Serial COM RS-232 port using Microsoft .NET 2.0 or later by using the System.IO.Ports.SerialPort class.

Way in the Past...

Back in my early (pre C# MVP) days, I had written an article on DevHood titled Serial COM Simply in C#. It became quite popular and is (currently) the top Google search for "serial c#". Now every week I get several e-mails with people asking questions and it is high time for some serious updating.

The article was (originally) written soon after .NET was introduced to the world, and other .NET serial port controls had not yet been written. So at the time, this was an easy solution. Just use the MSComm.ocx control from VS6 which most Devs had at the time. Now however, there are many easier and preferred methods than dealing with the complexities of interoping with an old legacy (non-.NET) ActiveX OCX control.

A Bright Future is Here!

Today, the primary solution is to use the new SerialPort control that is part of .NET 2.0 and is freely available in C# Express on MSDN. It is considerably easier to use and is a true .NET component.

Download Button  - Small For loyal fans of the tutorial, I've written a sample code application, SerialPortTerminal.zip, which you can try out to see how the new SerialPort control is used. Requires Visual Studio 2005 & .NET 2.0 or later to compile & run.

Continued Support

Due to the high volume of e-mail I've been receiving on serial port communication in general, I've wrote this post and added an FAQ section to the bottom of the post. Check this first if you have questions. If you post a question as a comment that hasn't been answered in the post, I'll add it to the FAQ section.

For those of you who I've directed to this blog post, please understand that I'm just another guy working away at a full time job (helping manage the release of Team System) who has worked with serial RS-232 ports in the past (moving on to USB now). I like to help people, hence I wrote the original article, this sample code, and the FAQ, but do not have the resources to answer additional serial port communication questions. Please check out the SerialCom FAQ for other .NET COM Port solutions and technical support options.

Get Connected Up

You can obtain USB to Serial adapters (from NewEgg, search using Froogle) and have just about as many ports on your PC as you like. I carry around two adapters with a null modem (what is it?, search Froogle) between them so I can create a loopback to send & receive through to separate ports on most any computer. I'd recommend doing the same for when writing code for the serial port.

If you'd like to quickly and easily create your own external devices to communicate with the PC, I recommend starting with the Parallax BASIC Stamp modules. Parallax has lots of easy accessories (such as LCDs, RF, Sounds, AD & DA, etc) for their modules. After that you could migrate to an Atmel Microcontroller (recommended) or Microchip PIC.

Let's Have the Code

Here is an example of how easy it is to use the new SerialPort control.

Very simply, here is how you can send a bit of data out the port.

// This is a new namespace in .NET 2.0
// that contains the SerialPort class
using System.IO.Ports;

private static void SendSampleData()
{
// Instantiate the communications
// port with some basic settings
SerialPort port = new SerialPort(
"COM1", 9600, Parity.None, 8, StopBits.One);

// Open the port for communications
port.Open();

// Write a string
port.Write("Hello World");

// Write a set of bytes
port.Write(new byte[] {0x0A, 0xE2, 0xFF}, 0, 3);

// Close the port
port.Close();
}


Now let's take a look at what it takes to read data in from the communications port. This demonstrates reading text; for an example of reading binary data, see my SerialPortTerminal.zip sample app.

  1. Create a new "Console Application" and replace all the default class code with this code
  2. Add a reference to "System.Windows.Forms" to the project
  3. Run w/ F5, to exit the app, press Ctrl-Break.
  4. Get Connected Up with two USB to Serial adapters and a null modem
  5. Use another app, the code above, or the SerialPortTerminal.zip example to send data and watch it come in with this code


#region Namespace Inclusions
using System;
using System.IO.Ports;
using System.Windows.Forms;
#endregion

namespace SerialPortExample
{
class SerialPortProgram
{
// Create the serial port with basic settings
private SerialPort port = new SerialPort("COM1",
9600, Parity.None, 8, StopBits.One);

[STAThread]
static void Main(string[] args)
{
// Instatiate this class
new SerialPortProgram();
}

private SerialPortProgram()
{
Console.WriteLine(
"Incoming Data:");

// Attach a method to be called when there
// is data waiting in the port's buffer
port.DataReceived += new
SerialDataReceivedEventHandler(port_DataReceived);

// Begin communications
port.Open();

// Enter an application loop to keep this thread alive
Application.Run();
}

private void port_DataReceived(object sender,
SerialDataReceivedEventArgs e)
{
// Show all the incoming data in the port's buffer
Console.WriteLine(port.ReadExisting());
}
}
}


One of the (several) new methods that is supported, and one I'm very glad is finally here, is the ability to obtain a list of the COM ports installed on the computer (ex: COM1, COM2, COM4). This is definately helpful when you want to present the list of ports avalible for the user to select from (as in the SerialPortTerminal.zip Win App example).

foreach (string s in SerialPort.GetPortNames())
System.Diagnostics.Trace.WriteLine(s);


Here are two helpful little methods for sending files through the serial port. Of course, these are the bare essentials and as always, you should check to make sure the port is open first (port.IsOpen) and use try/catch around trying to open a file, but you get the gist with this code. The binary sending routine is limited to about 2GB (the size of an int), but this should be okay for most uses.

using System.IO;

private static void SendTextFile(
SerialPort port, string FileName)
{ port.Write(File.OpenText(FileName).ReadToEnd()); }

private static void SendBinaryFile(
SerialPort port, string FileName)
{
using (FileStream fs = File.OpenRead(FileName))
port.Write((
new BinaryReader(fs)).ReadBytes(
(int)fs.Length), 0, (int)fs.Length);
}


RS-232 Project Photos

Each of these involve RS-232 serial port communications.

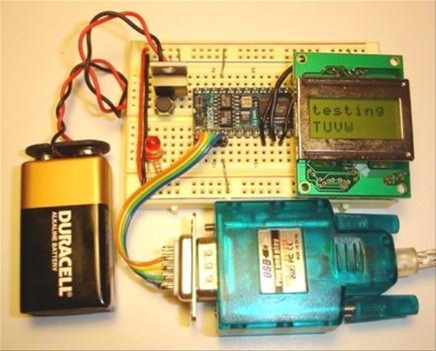
Just what's needed to get started with microcontrollers,
a Basic Stamp, mini LCD display, power, and RS-232 port.


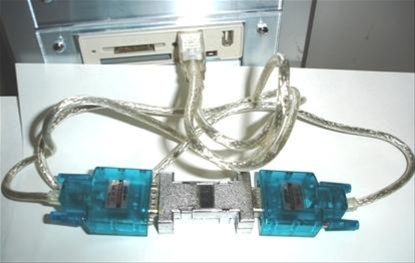
Two USB to Serial adapters with a null modem
to loopback and test your serial software.


The brains to a mini automated radio station that let me
control my PC & home using my HAM radio from around town.


Port Wiring Notes

DB9 Male (Pin Side)                   DB9 Female (Pin Side)
DB9 Female (Solder Side) DB9 Male (Solder Side)
------------- -------------
\ 1 2 3 4 5 / \ 5 4 3 2 1 /
\ 6 7 8 9 / \ 9 8 7 6 /
--------- ---------

DB9 Female to DB9 Female Null-Modem Wiring
2 | 3 | 7 | 8 | 6&1| 5 | 4
---- ---- ---- ---- ---- ---- ----
3 | 2 | 8 | 7 | 4 | 5 | 6&1

9-pin 25-pin Assignment From PC
------ ------ ------------------------- ------------
Sheild 1 Case Ground Gnd
1 8 DCD (Data Carrier Detect) Input
2 3 RX (Receive Data) Input
3 2 TX (Transmit Data) Output
4 20 DTR (Data Terminal Ready) Output
5 7 GND (Signal Ground) Gnd
6 6 DSR (Data Set Ready) Input
7 4 RTS (Request To Send) Output
8 5 CTS (Clear To Send) Input
9 22 RI (Ring Indicator) Input

- RTS & DTR are binary outputs that can be manually set and held
- DCD, DSR, CTS, and RI are binary inputs that can be read
- RX & TX can not be set manually and are controlled by the UART
- maximum voltages are between -15 volts and +15 volts
- binary outputs are between +5 to +15 volts and -5 to -15 volts
- binary inputs are between +3 to +15 volts and -3 to -15 volts
- input voltages between -3 to +3 are undefined while output voltages
between -5 and +5 are undefined
- positive voltages indicate ON or SPACE, negative voltages indicate
OFF or MARK


Other Resources

Here are some additional sites, libraries, tutorials, etc. These are links that I just found around the net and am providing for convenience (they are not endorsed).

Where CF = Compact Framework

The Final Say (aka Conclusion)

The new SerialPort class in .NET 2.0 rocks! It is much easier to use than getting the old MSComm.ocx control going in a .NET app, contains new functionality, is a 'native' .NET control, has docs built into the MSDN Library, and is easy to use.

Frequently Asked Questions (FAQ)

I'm adding this section (as of 8/10/06) to address the common questions I get on this post and through e-mail. Chances are, if you ask a good question in the comments here, I'll post it here for others to see easily.

  1. Q: When updating a control (like a text box) while in the DataRecieved event, I get an error.
    A: The SerialPort class raises events on a separate thread than the main form was create on. Windows Forms controls must be modified only on their original thread. Thankfully there is an easy way to do this. Each Windows control has a "Invoke" method which will run code on the control's original thread. So to put the recently received data into a text box (txtLog), this would do it: txtLog.Invoke(new EventHandler(delegate { txtLog.Text += comport.ReadExisting(); }); You can see this more in action in the "Log" event of "Terminal.cs" my sample code project, SerialPortTerminal.zip.
  2. Q: I can't find the System.IO.Ports namespace.
    A: Using Visual Studio 2003? The new namespace, and SerialPort class, is part of .NET 2.0 and Visual Studio 2005. It is not included in .NET 1.x (and Visual Studio 2003). Even if you have .NET 2.0 or Visual Studio 2005 installed, you can not access the class from within Visual Studio 2003.
  3. Q: I only have .NET 1.1, what can I do?
    A: Upgrade to .NET 2.0. Seriously, it's free. In fact, you can get the great C# and VB Visual Studio Interactive Development Environment (IDE) editors for FREE now with C# Express and VB Express. The .NET 2.0 Software Development Kit (SDK) for command-line development is also free. If you really must stay in .NET 1.1, you can use the technique I talk about in Serial COM Simply in C# or a 3rd party library.
  4. Q: I'm sending data to my device, but it is not responding.
    A: First make sure the device will respond using a standard app like Hyperterminal. Check the settings (baud rate, data bits, stop bits, etc) and make sure they match with your code. Try sending binary data via binary arrays. Many devices expect a carriage return at the end of a command, so be sure to send 0x0D or \n. String data can be easily converted to a binary array using:
    byte[] data = System.Text.ASCIIEncoding.Default.GetBytes("Hello World\n");
    com.Write(data, 0, data.Length);
    Many devices require several carriage returns first to sync baud rates, so send several, like: com.Output("".PadLeft(9, '\n')); It you're communicating with a modem, make sure Echo Back is turned on. Send "ATE1\n". Other than this, just keep trying and playing around with it. It can be hard because you don't see the response from the device as easily as you would with a terminal app.
  5. Q: When I put received data to a text box or rich text box, I get a strange symbols.
    A: The default font of text boxes is designed only to show standard characters. Try using "CharMap" (a free tool in WinXP, click "Start", "Run", type "CharMap", enter). "Terminal" is a font designed to show classic ASCII characters and is what most terminal apps (like my sample code and Hyperterminal) use. There are also many ASCII codes that won't display correctly. This is why I choose to show the hex data instead of an ASCII string a lot of the time. System.Convert.ToString(mybyte, 16) will convert a byte to a string hex code, for example: byte b = 13; string s = Convert.ToStrong(b, 16).PadLeft(2, '0'), then s will contain "0D". See the "ByteArrayToHexString" and "HexStringToByteArray" methods in my sample app, SerialPortTerminal.zip.
  6. Q: What about USB communications? How can I do USB?
    This post isn't about USB. Believe me, I wish the .NET framework supported USB natively, and I'm doing what I can here at Microsoft to see USB get into the framework in the future. For now, you can use a USB to Serial adapter. I use a lot of these. They plug into the USB port, then appear just as a SerialPort to the PC. Microcontroller vendors such as Microchip, Atmel, and TI make chips that do this for projects. There is a lot of info on USB and C# out there too (such as this great article).
  7. Q: Can I use the sample code here in my own projects (commercial or not)?
    Yes! All sample code on my blog is free public domain material. I'm not a legal guy so I don't know the exact words to use, but I'll try... I'm not responsible for any problems! Use at your own rick etc. However, have at it, if it helps you out, fantastic, that's what it's here for.
  8. Q: When using SerialPort.Open() (or SerialPort.PortOpen = true) I get the exception "UnauthorizedAccessException" or the error "An unhandled exception of type 'System.Runtime.InteropServices.COMException' occurred in axinterop.mscommlib.dll"
    It may be one of a few factors:
    • It may require Administrative privileges to use the port.
    • The port may already be open by another program, only one app can use a port at a time.
    • The port may not exist on the computer (this happens a lot). Verify the port you're trying to open is listed in the Device Manager (FAQ #9).
    • The name being provided is not exactly correct.
      Use the full name of the port when opening, like "COM1" (not "1")
  9. Q: How do I know what COM ports are on my PC?
    Use the Device Manager ("Start", "Run", "devmgmt.msc") and look for the "Ports" node (see below). If you don't see a Ports node, it's because there are not Serial or Parallel ports installed in the PC. Many laptops these day's don't have a serial port. You can get more serial ports very easily today with USB to Serial adapters.

  10. Q: How do I communicate with my specific device? Modem, Mobile Phone, LED/LCD Display, Scanner, etc
    This post is specific to general, device independent, serial port communications. You will need to find information about the protocol used for your specific device elsewhere. Comments that ask about specific devices will be deleted (to reduce spam). I'd recommend looking on the manufacture's website, writing/calling the manufacture, or searching online for your specific device, like "Motorola Razor Serial Protocol".
  11. Q: What pins can I use for powering devices, a high signal, or for boolean input & output?
    The TX & RX pins carry the standard serial signal, but the other pins can be used as high/low input/output pins. The output pins (4 DTR or 8 CTS), supply 5 to 15 volts (15v is proper RS-232 standard) when high and 0 to -15 volts when low. They only supply flea current so they're not meant to be used for powering any devices (like USB is designed for). However, they can be used as a reference voltage or for switching to one of the input pins for a high or low signal. The input pins (1 DCD, 6 DSR, 8 CTS, and 9 RI) can be used to detect a high or low signal. Proper RS-232 signal levels are -15v for a low and +15v for a high (compared to ground, pin 5). A MAX232 or similar chip takes a TTL 0-5v input and produces the -15v to +15v levels. However, most PC RS-232 COM ports will accept a 0v for low and 5v for high, but it is not guaranteed and alters from PC to PC. If you want a simple "toggle high", just hold pin 4 DTR high, and switch it to pin 1 DCD. The .NET SerialPort class has easy to use properties for switching the output pins high or low and for detecting the current level of the input pins. I have been able to use pin 4 DTR for a very low current (20ma max) PIC processors, but not reliably. I prefer to always supply external power and use pin 4 as a signal to turn on or off my device. I'll attach pin 4 to a transistor that switches my power source to my PIC to turn it on or off.
  12. Q: What about ‘packets’? Does RS-232 support any commands or data segregation?
    No. Serial data flow through RS-232 has nothing to do with ‘packets’. It’s just a stream of bytes in and out. Any notion of data compartmentalization (packets) would have to be coded by you for your unique use. Much of my time working with serial has been spent on defining useful packet like protocols, that usually include some type of header, command structure, and CRC check. For example, the first two bytes are the packet length, the next two bytes is the command, next two bytes are parameters, and the last byte is a CRC. Then my apps would buffer incoming data and look in the buffer for valid packets. Of course it differs depending on the device you’re working with and your specific needs. USB does have specific communications protocol defined, one of them being command based, like the little packet just mentioned. But with USB, you’re able to get the whole command and parameter together at once, with serial you have to create the protocol yourself, buffer, and parse the data. My previous serial post has more info under the header “Protocol Development”.
  13. Q: How do you detect when a device is connected or disconnected?
    Simply put, the device usually start or stop sending data. There is no built in events on a connect or disconnect. But there are a few tricks you can do, if you’re creating the serial device you have more options. I’ve had my devices (and PC apps) send a constant “are you there” set of bytes, like 00 00 11 11 00 00 hex (I’d use a ‘are you there’ custom ‘packet’ as in Q12 above) till a device on the other end responds. You could also use hardware, that’s what some of the other signals lines are for (CDC, DSR, RTS, CTS, RI), you can tie one of these high and then catch an event when the line goes high you know there’s a device there, when it goes low the device is gone.
  14. Q: How can I get more support? What are my support options?

Serial COM Simply in C#

Serial COM Simply in C#

Serial COM port communications has always been one of my favorite topics. Ever since I was 15 I was writing code to communicate with electronics my Dad or I made.

Unfortunately VS.NET does not have a serial communications framework in place. So this tutorial explains how to easily communicate through a serial port using the MSComm OCX that is included with VB in Visual Studio 6 (and previous versions). You must have at least the ActiveX components of VS6 installed in order to use MSComm because it is a licensed control.

Required: MSComm.ocx installed with Visual Studio 6.
Note: To obtain MSComm.ocx and it's associated licensing, you can do a custom install of Visual Studio 6 and just install the ActiveX components (about 5MB).

Adding the MSComm Control


You must add the control to a form instead of just instantiating the control straight from code because it requires special OCX state information and a developing license be included in your program's assembly. By drawing it onto a form, VS.NET handles these for you.
  1. Create a new Windows Form
  2. Add the MSComm COM/OCX Control to your "Windows Forms"
    1. Right Click on the Toolbox
    2. Choose "Customize Toolbox..."
    3. Select and add the "Microsoft Communications Control"
  3. Draw the new control onto your form (Telephone icon)

Properties and Event Info


Here is a quick overview of some important properties of the MSComm control.
  • com.CommPort
    Sets or gets the computer's serial port to be used.
  • com.PortOpen
    Opens or closes the serial port.
  • com.RThreshold
    Sets how many characters should be received before firing the OnComm event. Set to 0 to disable event calling. Set to 1 to fire OnComm every time a character is received.
  • com.InputMode
    On of the MSCommLib.InputModeConstants constants to specify either sending/receiving text strings or byte arrays. Defaults to text which is easier to work with but not as reliable as byte arrays.
  • com.Settings
    Used to setup the port in the format "baud,p,d,s" where baud = baud rate, p = parity, d = # data bits, and s = # stop bits. Ex: com.Settings = "9600,n,8,1"
  • com.Handshaking
    On of the MSCommLib.HandshakeConstants constants to specify the type of handshaking: none, RTS/CTS hardware hs, and/or XOn/XOff software hs
  • com.InBufferCount
    Returns the number of characters waiting in the receive buffer.
  • com.Input
    Returns and removes a stream of data from the receive buffer. Used to check for data waiting. Returns a string if in text mode or byte array if in binary/byte mode.
  • com.Output
    Writes a stream of data to the transmit buffer. Ex: com.Output = "Hello" sends "Hello" through the serial port.
  • com.CommEvent
    Returns a MSCommLib.CommEventConstants, MSCommLib.ErrorConstants, or MSCommLib.OnCommConstants constant representing the most recent error or event that occurred. Check this in the OnComm event.
  • com.NullDiscard
    If true, the serial control will ignore all 0x00 (null) characters come in. You will usually want to disable this so you can receive 0x00 since it may be important.
  • com.InputLen
    The number of characters the Input property reads from the receive buffer. Setting InputLen to 0 reads the entire contents of the receive buffer when com.Input is used.
OnComm Event
The one single event that the com control calls is the OnComm event whenever something happens. To use this, be sure to set RThreshold = 1 and check the InBufferCount inside your event. Use com.CommEvent for more information as to why the OnComm event was fired. Example:
public MyForm()
{
InitializeComponents(); // Initialize Form Components
com.RThreshold = 1; // Fire OnComm event after any data is received
com.OnComm += new System.EventHandler(this.OnComm); // Assigns the event handler
}

private void OnComm(object sender, EventArgs e) // MSCommLib OnComm Event Handler
{
if (com.InBufferCount > 0) ProcessData((string) com.Input);
if (com.CommEvent == MSCommLib.OnCommConstants.comEvCTS)
Console.WriteLine("CTS Line Changed");
}


Protocol Development


If you are making your own serial interface/protocol, you really must have a good standard in place. Serial data flows into the com port byte by byte and must be buffered and parsed correctly. Think of it this way, if a terminal sent your computer "Hello World" it may come in as four OnComm triggers: "H", "ello", " Wo", and "rld"

The best protocols are usually a mix of these methods.
Here are three simple protocol techniques:
  1. Beginning and Ending ("Start" & "Stop") Codes
    This is good for sending text as it lets everybody know when text starts and ends. You simply tack on a non-normal byte at the beginning and end of the text. For example, you'd use '---' to signify the start of the string and '===' to signify the end. So you would use: com.Output = "---Hello World===";
  2. Fixed Length Codes
    Used for specific commands. You can create your own codes to send and specify what they mean. Say I want to control the lighting in a house, I'd setup a protocol of commands like this:
    1st byte = House Code, 2nd byte = Light Code, 3rd byte = On or Off (0 for off, 1 for on)
    So to turn on the 11th light in my house (house code #3) I'd use:
    com.Output = new byte[] {3, 11, 0};
  3. Prefixed Data Packet
    This is probably the most common and flexible but requires the most coding. Just prefix your data packet with the length of the data. The prefix must be a fixed size, such as two bytes which would allow a data packet of up to 65,535 bytes. Then the receiver knows how much data is in the packet because it always takes the first two bytes and uses the rest as the data packet.
    Example: com.Output = ((char) 00) + ((char) 11) + "Hello World";

Physical Port Layout and the Null Modem


Pin Assignments
9-pin 25-pin Assignment
Sheild 1 Case Ground
1 8 DCD (Data Carrier Detect)
2 3 RX (Receive Data)
3 2 TX (Transmit Data)
4 20 DTR (Data Terminal Ready)
5 7 GND (Signal Ground)
6 6 DSR (Data Set Ready)
7 4 RTS (Request To Send)
8 5 CTS (Clear To Send)
9 22 RI (Ring Indicator)

The Null Modem Adapter
There is a standard serial adapter called a Null Modem adapter (obtainable at most Radio Shacks) that crosses over the TX and RX lines to enable you to connect two computer together. This is important because if you wire one com port directly into another, the transmit lines (TX) will both be connected together and both ports will be trying to transmit on the same line (similarly for the RX lines). A null modem usually crosses over the flow control lines too. Here is a layout diagram if you want to make your own:

           DB9 Female to DB9 Female

2 | 3 | 7 | 8 | 6&1| 5 | 4
---- ---- ---- ---- ---- ---- ----
3 | 2 | 8 | 7 | 4 | 5 | 6&1


DB25 Female to DB25 Female

2 | 3 | 4 | 5 | 6&8| 7 | 20
---- ---- ---- ---- ---- ---- ----
3 | 2 | 5 | 4 | 20 | 7 | 6&8


Physical Pins Layouts
Here is a diagram of the pin layout for the DB9 and DB25 connectors. Most connectors already have little tiny numbers next to the pins.
          DB9 Male (Pin Side)                   DB9 Female (Pin Side)
DB9 Female (Solder Side) DB9 Male (Solder Side)
------------- -------------
\ 1 2 3 4 5 / \ 5 4 3 2 1 /
\ 6 7 8 9 / \ 9 8 7 6 /
--------- ---------


DB25 Male (Pin Side) DB25 Female (Pin Side)
DB25 Female (Solder Side) DB25 Male (Solder Side)
--------------------------------- ---------------------------------
\ 1 2 3 4 5 6 7 8 ... 13 / \ 13 ... 8 7 6 5 4 3 2 1 /
\ 14 15 16 17 18 19 20 ... 25 / \ 25 ... 20 19 18 17 16 15 14 /
----------------------------- -----------------------------


Example Code


To use this:
  1. Create a new form
  2. Add the AxMSCommLib control and name it "com"
  3. Add a Rich Text Box named "rtfTerminal"
  4. Put the constructor code below in the form's constructor
  5. Add the rest of the code. Make sure the settings are right for your system.
  6. Have another computer with a null modem connecting the two and a terminal programming (such as Tera Term Pro) running.

// Constructor for Form with an AxMSCommLib control on it named "com"
public SerialTerm()
{
// Initialize Form Components
InitializeComponent();

// Initialize the COM Port control
InitComPort();

// Send data out through the COM port
com.Output = "Serial Terminal Initialized";
}

private void InitComPort()
{
// Set the com port to be 1
com.CommPort = 1;

// This port is already open, close it to reset it.
if (com.PortOpen) com.PortOpen = false;

// Trigger the OnComm event whenever data is received
com.RThreshold = 1;

// Set the port to 9600 baud, no parity bit, 8 data bits, 1 stop bit (all standard)
com.Settings = "9600,n,8,1";

// Force the DTR line high, used sometimes to hang up modems
com.DTREnable = true;

// No handshaking is used
com.Handshaking = MSCommLib.HandshakeConstants.comNone;

// Don't mess with byte arrays, only works with simple data (characters A-Z and numbers)
com.InputMode = MSCommLib.InputModeConstants.comInputModeText;

// Use this line instead for byte array input, best for most communications
//com.InputMode = MSCommLib.InputModeConstants.comInputModeText;

// Read the entire waiting data when com.Input is used
com.InputLen = 0;

// Don't discard nulls, 0x00 is a useful byte
com.NullDiscard = false;

// Attach the event handler
com.OnComm += new System.EventHandler(this.OnComm);

// Open the com port
com.PortOpen = true;
}

private void OnComm(object sender, EventArgs e) // MSCommLib OnComm Event Handler
{
// If data is waiting in the buffer, process it.
// Note: This is using the string method for simple data, be sure
// to use byte arrays (described below) for more generic data.
if (com.InBufferCount > 0) ProcessComData((string) com.Input);
}

private void ProcessComData(string input)
{
// Send incoming data to a Rich Text Box
rtfTerminal.AppendText(input + "\n");
}


Advanced Topic: Loop Based vs Event Based Receiving


In most cases you will want to set RThreshold = 1 to fire the OnComm event every time some data is received. But there are cases when it would be easier to use a loop to wait for and capture incoming data.

My favorite scenario is in creating pseudo plug & play port detection for my devices. When my app starts it scans the com ports for my device. Here is some example code to find the port that my device is on. See that by setting RThreshold = 0 and disabling the OnComm event, I can quickly and easily have a completely self contained bit of code to preform the task. Be sure to always including time outs to prevent getting caught in an endless loop.
public short FindDevicePort()
{
bool PortOkay = true; short TestPort = 0;
bool found = false; // Init variables for checking.

// Stop the OnComm event and normal processing.
com.RThreshold = 0;

// Close the current port if one is already open.
if (com.PortOpen) com.PortOpen = false;

do
{
TestPort++; // Try the next port
PortOkay = true;

// Attempt to access this port number (mayby it doesn't exist on this computer)
try {com.CommPort = TestPort;}
catch (System.Runtime.InteropServices.COMException)
{PortOkay = false;}

if (PortOkay) // Continue if the port exists
{
// Attempt to open the port (maybe it's already in use by another program)
try {com.PortOpen = true;}
catch (System.Runtime.InteropServices.COMException)
{PortOkay = false;}

if (PortOkay) // Continue if port was available and opened
{
com.Output = "Hello?"; // Send string to request a response.

long TimeStamp = DateTime.Now.Ticks; // Time Stamp for Time-out
string buffer = "";
bool ElapsedTime;
do
{
// Don't lock up the entire application,
// release control to process other messages.
System.Windows.Forms.Application.DoEvents();

// If there is data waiting, buffer it in our own string buffer.
if (com.InBufferCount > 0) buffer += com.Input;

// Look for response from device.
found = (buffer.IndexOf("Hi There") > -1);

// True if time is up, change the 0.2 for human interaction
ElapsedTime = DateTime.Now.Ticks - TimeStamp >
TimeSpan.TicksPerSecond * 0.2;

// Keep waiting until found or 0.2 seconds are up.
} while (!ElapsedTime & !found);
}
}
} while ((TestPort < 4) & !found);

// If the device was found, return the port it was found on
if (found) return TestPort;

// Device not found, return 0.
return 0;
}


Techniques for Sending & Receiving Data


These are frequent issues that arise. If you are experiencing difficulty sending or receiving data, please review these topics and methods for a solution.

Sending Unusual Data w/ Byte Arrays
Generally using the text/string method is easiest, but it can cause unpredictable results when dealing with many special characters. In this case you should use byte arrays. Ex: com.Output = new byte[] {0, 0x41, (byte) 'A', 255};

Receiving Unusual Data w/ Byte Arrays
As with sending, most of the time data comes in through the com port in any form, not just letters A-Z and numbers. If you use a terminal program and see strange characters, you will need to use byte arrays. Here's how:
  1. Setup com.Input for receiving byte arrays. Change your "com.InputMode" to:
    com.InputMode = MSCommLib.InputModeConstants.comInputModeBinary;
  2. When receiving data, store into a byte array.
    Here is an example OnComm event:
    private void OnComm(object sender, EventArgs e)  //  MSCommLib OnComm Event Handler
    {
    // Receive data into a byte array, good for any type of data
    byte[] indata = (byte[]) com.Input;

    // Show each byte received in the "Output" window
    foreach (byte b in indata)
    Console.WriteLine("Byte Data: " + b);
    }


Receiving Data Packets / Timing Issues
Remember, data is not received in nice, easy to manage packets. If your devices sends "Hello World", it could come in through the com.Input property in several steps, like "He", "llo ", "W", "orld". This can make it difficult to process incoming data. Here are some techniques to receiving data:
  1. Use "Start" & "Stop" Tokens
    This is by far the preferred method of the three. If you can design your protocol, use one of the methods described above, such as the "Start" and "Stop" codes. Prefix and suffix the data with known codes to signify the beginning and ends of a data packet. Then when data comes in, buffer it and just check the buffer. The example below is with strings since they are generally easier to work with.
    // We'll use Regular Expressions to match the data 'start'/'stop' tokens
    using System.Text.RegularExpressions;

    // Used to buffer the incoming serial data
    private string ComBuffer = "";

    private void OnComm(object sender, EventArgs e) // MSCommLib OnComm Event Handler
    {
    // Add to the buffer the incoming data
    ComBuffer += (string) com.Input;

    // Example regular expression test string
    // string ComBuffer = "trash---Hello World===trash---How Are You?===trash";

    // Build a regular expression to match data that
    // starts with '---' and ends with '==='
    Regex r = new Regex("---.*?===");

    // Cycle through the matches
    for (Match m = r.Match(ComBuffer); m.Success; m = m.NextMatch())
    {
    // Display the result to the 'Output' debug window
    Console.WriteLine(m.Value);

    // Remove the find from the string buffer
    ComBuffer = ComBuffer.Replace(m.Value, "");
    }
    }


  2. Time Interval Packets, Using a Timer
    If you know that data will be coming in at defined time intervals, say there is always at least a second before the next set of data, then use a timer method. If you used a loop you could easily tie up system resources. Again you will need to buffer the data.
    // Use the system timers library
    using System.Timers;

    // Used to buffer the incoming serial data
    private string ComBuffer = "";

    // Create a new timer for serial data watching
    private Timer tmrWaitData = new Timer();

    // You will need to initialize the timer
    private void ExtraInitCode()
    {
    // Set the timer interval to one second
    tmrWaitData.Interval = 1000;

    // Attach the timer tick event handler
    tmrWaitData.Elapsed += new ElapsedEventHandler(tmrWaitData_Elapsed);
    }

    private void OnComm(object sender, EventArgs e) // MSCommLib OnComm Event Handler
    {
    // Check to see if data is waiting
    if (com.InBufferCount > 0)
    {
    // Add to the buffer the incoming data
    ComBuffer += (string) com.Input;

    // Reset the timer
    tmrWaitData.Stop();
    tmrWaitData.Start();
    }
    }

    private void tmrWaitData_Elapsed(object sender, ElapsedEventArgs e)
    {
    // Show to the 'Output' window the data that was received
    Console.WriteLine("Data Packet: " + ComBuffer);

    // Stop the timer now that this data packet
    // has been successfully received
    tmrWaitData.Stop();
    }


  3. Limit the Incoming Buffer Trigger
    If you know that data will always come in at a fixed amount, for example 10 characters, you can change the com.RThreshold value to trigger the OnComm event only when that amount has been received. Normally you would want OnComm to be triggered whenever any data is received, but you can change this if you are careful that all your data comes in the same amount of bytes/characters.

References